Tuesday, August 28, 2012

Amigurumi Pattern: Penny The Penguin

Hello, I am Penny the penguin who enjoy sunbathing with my bunny-eared hat =)

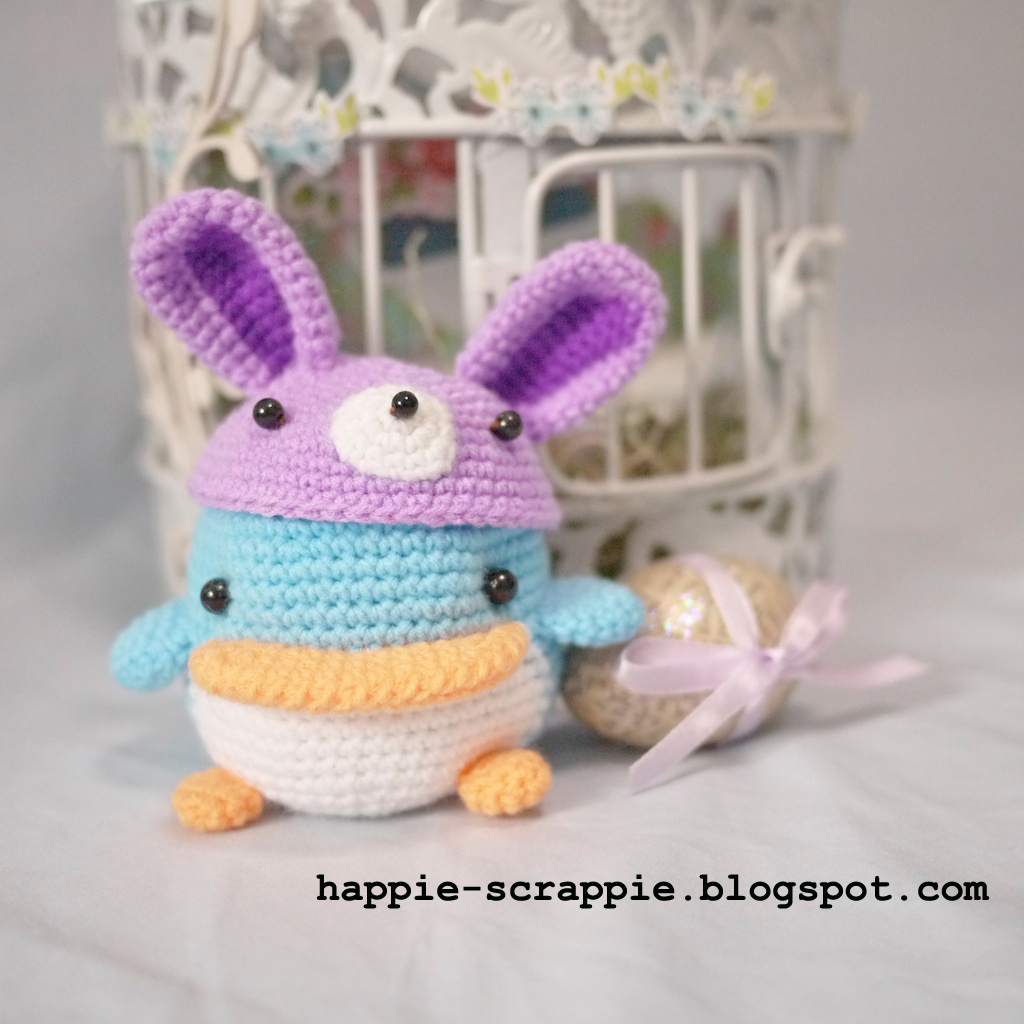
The purple bunny hat fits her just nice

Penny the penguin can be an Easter bunny too!

And this is Penny being herself, without the cute hat. 


This is a free amigurumi pattern that I have shared on my Etsy listing ages ago. Decided to post it over here so that I do not have to keep re-list the free pattern.


Materials:
  • Acrylic yarn - White (turquoise or blue, white, pale yellow or orange, grey)
  • Stuff of your choice (I normally prefer polyfill)
  • One pair of black beads / plastic eyes (size of your choice)
  • Black embroidery floss (for attaching the black beads as eyes)


Tools:

  • Crochet hook size C (or any crochet hooks suitable for the yarn you use)
  • Tapestry needle & Sewing needle for yarn


Finished Size: 
Approximately 11cm tall. (I use a Clover size C crochet hook.)
*Your finished doll might finish in bigger or smaller than mine depending on your tension and
the yarn you use.*

Abbreviation:
R = Round
ch = chain
sc = single crochet
st = stitch
inc = increase (2sc in a stitch)
dec = decrease (2sc off together)
sl st = slip stitch(es)
* = repeat directions between * and * as many as indicated
() = number of stitches in each round

NOTES:
1) Work in continuous spiral round; do not join rounds unless otherwise stated. Mark first stitch of each round.
2) To change color, work last st of old color to last yarn over. Yarn over with new color and draw through all loops on hook to complete st. 

Penguin x 1 (blue & white colour)
Start with blue color; make adjustable rings
R1: 6 sc in rings (6)
R2: inc 6 (12)
R3: *sc 1, inc 1*, repeat 6 times (18)
R4: *sc 2, inc 1*, repeat 6 times (24)
R5: *sc 3, inc 1*, repeat 6 times (30)
R6: *sc 4, inc 1*, repeat 6 times (36)
R7: *sc 5, inc 1*, repeat 6 times (42)
R8: 1 sc in each stitch (42)
R9: *sc 6, inc 1*, repeat 6 times (48)
R10: 1 sc in each stitch (48)
R11: *sc 7, inc 1*, repeat 6 times (54)
R12 - R15: 1 sc in each stitch (54) 

Everything is in blue from R1 to R15. You need to change colour for the remaining rounds.
R16: sc 18 (blue), sc 18 (white), sc 18 (blue) (54)
R17: sc 17 (blue), sc 20 (white), sc 17 (blue) (54)
R18 - R22: sc 16 (blue), <sc 22 (white)>, sc 16 (blue) (54)
R23: <dec 1,sc 7, dec 1, sc 5> (blue), <sc 2, dec 1, sc 7, dec 1, sc 9> (white), <sc 1, dec 1, sc 4, dec 1, sc 7> (blue)(48)
R24: <sc3, dec 1, sc 6, dec 1, sc 2> (blue), <sc 4, dec 1, sc 6, dec 1, sc 5> (white), <sc 1, dec 1, sc 6, dec 1, sc 3> (blue) (42) 
R25: <dec 1, sc 5, dec 1, sc 5> (blue), <dec 1, sc 5, dec 1, sc 7> (white), <sc 2, dec 1, sc 1, dec 1, sc 5> (blue) (36)
R26: <sc 3, dec 1, sc 4, dec 1, sc 1> (blue), <sc 3, dec 1, sc 4, dec 1, sc 3> (white), <sc 1, dec 1, sc4, dec 1, sc 1> (blue) (30)
R27: <dec 1, sc 3, dec 1, sc 3> (blue), <dec 1, sc 3, dec 1, sc 3, dec 1> (white), <sc 3, dec 1, sc 3> (blue) (24)

Change to white:
R28: *sc 2, dec 1*, repeat 6 times (18)
R29: *sc 1, dec 1*, repeat 6 times (12) <start stuffing polyfill>
R30: *dec 1*, repeat 6 times (6)

Close with sl st, leaving a long tail for sewing. Weave tail through last round and gather tightly. Knot to secure. 

Edit: 21/12/2012 - There is slight error in R2 which i amend it. Will post up either photo tutorial / video soon! thanks! Beak: (orange color)
We are going to crochet an oval and fold into half before sew & attach it to the body of penguin. Click here for the extra helpful video tutorial about how to crochet an oval. (Note: the number of sc in my pattern & the video tutorial is different)
Start with orange color, make 11 ch, (last chain is a 'turning chain' which will not be worked into later)
R1: sc 9, inc 2, sc 8, inc 1, sl st (22)
R2: Ch 1, inc 1, sc 8, inc 5, sc 8, inc 3, sl st (28)
R3: Ch 1, inc 1, sc 9, inc 1, sc 1, inc 1, sc 1, inc 1, sc 9, inc 1, sc 1, inc 1, sc 1, sl st (34)
R4: Ch 1, inc 1, sc 10, inc 1, sc 2, inc 1, sc 2, inc 1, sc 10, inc 1, sc 2, inc 1, sc 2, sl st (40) 


Fasten off & leave a long tail for sewing. Remember to fold into half before sewing & attach it to the R15 of the penguin.


** Alternatively, if you are still clueless on how to crochet an oval, you could try this pattern for making the beak.
Start with orange yarn, make adjustable rings
R1: 6 sc in rings (6)
R2: inc 6 (12)
R3: *sc 1, inc 1*, repeat 6 times (18)
R4: *sc 2, inc 1*, repeat 6 times (24)
R5: *sc 3, inc 1*, repeat 6 times (30)
Fasten off & leave a long tail for sewing. Remember to fold into half before sewing & attach it to the R15 of the penguin. **

Edit: 21/12/2012 (the pattern for the wings was written wrongly. It's for another penguin that is now shown here. Thanks EV MC for pointing this out =)) Wings: (Make 2, blue colour)
Start with adjustable rings
R1: 6 sc in rings (6)
R2: inc 6 (12)
R3: *sc 3, inc 1*, repeat 3 times (15)
R4: 1 sc in each stitch (15)
R5: 1 sc in each stitch (15)
R6: *sc 3, dec 1*, repeat 3 times (12)
Fasten off & leave a long tail for sewing. Remember to fold into half before sewing & attach it to the R17 on each side of the penguin.

Feet: (Make 2, orange colour)
Start with adjustable rings
R1: 6 sc in rings (6)
R2: *inc 1, sc 1*, repeat 3 times (9)
R3: *inc 1, sc 2*, repeat 3 times (12)
R4: **sc 2, dec 1*, repeat 3 times (9)
R5: *sc 1, dec 1*, repeat 3 times (6)
Fasten off & leave a long tail for sewing.

*Sew all parts together & a pair of platic eyes*

Ta-dah!! You are done!!!

***This is my very first time writing pattern. Feel free to convo me if you are stuck in the middle or you find some error in the pattern***


Do leave me a comment if you like to have the pattern for making the bunny hat =) Happy crocheting!

Update: Click here for the bunny hat pattern =)

** This pattern is for personal use only. Copyright is reserved. You may not use this pattern or doll produced from this pattern for retail or commercial purposes. ** 

Friday, August 24, 2012

Let's Crochet: Magic Adjustable Ring Tutorial

I remember when I was a little girl, my mum always crochet some really gorgeous dress for me. She always had this orange yarn bowl with a few balls of yarn mainly in white and pastel yellow color in the living room. She said she didn't know how to sew me pretty dresses so all she could do for me is crochet dresses for me. Some of dresses had been passed to my young cousin, Isabella.


She was wearing one of the crochet dresses when she was 3 years old. Mum had been keeping those dresses for more than 20 years because they are just so precious! As you could see in the pictures, my mum was so used to crochet dresses using those tiny lace crochet yarn which took forever for her to complete a dress as compared to those chunky / heavy weighted yarn. The reason mum using lace yarn / light weighted yarn because those really thick wool yarn will be too warm for a tropical country like Malaysia. And guess what? I am sort of allergic to wool. 

Mum is the one who got me started crochet but I have never crochet anything else other than amigurumi. The fundamental of amigurumi is single crochet everything in ROUND. And mum taught me crochet in round by using "Chain 2 method". So when I just started crochet or making amigurumi, I usually took more than an hour to complete the very very first round of my amigurumi because I would try very very hard to make the loop in the middle as tiny as possible.

Left: Chain 2 method: Ch 2, 6 SC in 2nd chain from hook.
        It left a much bigger hole than the Magic Ring. 
Right: Magic Ring, 6 SC in Magic Ring. 
           Magic ring makes your amigurumi project much neater with the almost invisible hole.

Here's the step-by-step (ultra lengthy) tutorial for making Magic Ring. Let's grab your hook & yarn and get started! (Click to view larger image)
Tadah! Once you have mastered the Magic Ring method, you can now start doing any amigurumi project! Do email me / leave me a comment if you have any questions when doing the magic ring. 
Here is the list of other really useful resources that provide tutorials for amigurumi:

I will start posting some really easy-peasy & practical amigurumi pattern real soon =) Have fun crocheting. 


Saturday, August 18, 2012

More Cards On The Way

As promise, I will definitely blog more often. Wow... its been a while since I have been making cards and buying new stamp sets. Some coloring bugs struck me and I had been coloring the cute stamp images from Lawn Fawn one whole day. Tried coloring with watercolor pencils and also added with water too. Love how it turned out! I went to Art Friend yesterday and was so tempted to get my hands on some Copic markers. But knowing myself love buying everything in one full set and it's gonna cost a BOMB in my bank account, I decided to skip buying those expensive markers! Anyway, i kept telling myself color pencils look equally good with different outcome too!

Made this special card for my god-ma who is gonna due anytime from now on! I can't wait to see my little god-sister soon.

Inside of the card must be pretty as well since this card is for someone very very close to me =)

Just another random card that I made to try my hands on the October Afternoon Woodland Park background stamp. Such a lovely stamp but I seriously have no clues how to fully utilize the pretty background stamp. 


Friday, August 17, 2012

What Else Can You Do With Erasers?

The picture says it all! We all love Fridays don't we? And all thanks to Hari Raya Adilfitri, it's a long weekend this week and I am gonna go back to Malaysia for 3 days! Woot woot! Can't wait to have fun with my furries and girlies + take lots of pics for scrapping!

I met up with my scrappy friend yesterday to learn eraser stamp carving. It was so fun to catch up with the Facebbook friends that I got to know via a scrapbook group. She showed me how she carved the panda-peanut stamp and I proceed with carving the speech bubble. It was so easy peasy as long as you have the right tools and patience. Yes... It takes a lot of patience to carve those intricate design.

And once I got home, I couldn't stop carving and came out with another 4 more eraser stamps. 

And here's what I do with the stamp image:
An ultra simple I-LOVE-YOU card for Ethan. The panda / bear took me quite a while to carve as I am not very good with carving intricate details like eyes and mouth etc. But it's worth the time & effort as I could see I will be using this stamp everywhere as it is so versatile. Bear can write anything and everything right? >_<


A Thank-You card made for Ash who taught me how to carve eraser stamps! many many thanks & many many loves 


Thursday, August 16, 2012

There Goes My July


This is my top top FAVE layout among all the layouts and minis I created using the Studio Calico July Kit. This dark color pattern paper is something that I would skip if I have seen it in the scrapbook store. But being very very determined to try using up every piece of paper, button, embellies, I pushed myself to create a layout using this paper from Authentique.

A lot of layering been done here using all the leftover scraps as this is one of the last layout created with the kit. Can't help but keep adding embellishments as I do not wanna keep hoarding on the embellies. New CHA products are here and seriously there is no point hoarding on the 'old stuff' while I keep buying & buying! 

Layering and embellies overdose here! PRetty heavy layout but Love love it =)


Been having so much fun with 8.5' x 11' layout recently. I could create a layout under 2 hours, fully embellished with this compact size page. I love being a productive scrapper as I have so many pictures waiting to be put on a layout / album.

This is  another layout dedicated for our Bintan Trip. This is actually the very first layout I created using July kit. So I actually posted my 1st & last layout using July Kit here. I have been addicted to stamping and punching recently. Love adding stamps as embellies on the layout. 


Those are real sea shells but I didn't get them from Bintan. Another friend of mine bought it from Redang Islands for me. Hahahaha.

When was the last time you go for a vacation? And do share with me your layouts with interesting vacation pics too! =) TFL!


Wednesday, August 15, 2012

Love Concoction

We went for Cocktail class for beginners one of the weekend and i scrapped 2 layouts the very next day. Just wanted a very very simple layout to house all the pics that I took during the class.

Love the pie stamps in the July Kit. So pretty and versatile! For some stupid reasons, my Cameo isn't working very well thus I hand-cut the "LOVE" word using pen knife. I guess it turn out awesome too =) I adore every embellies in the July kit to bits... the birdie wood veneer, the stamps, the flags and the papers are all so pretty!


I want to add some mixed-media technique to this particular layout dedicated for my scrappy - stamping buddy, Cheryl. She pretty much adore mixed media techniques in her layout while I always prefer my layout to be clean and tidy.

I didn't know what to deal with the acrylic paint so I just splashed a huge amount of white acrylic paint on the papers and used a paint brush to spread it rather un-evenly. Then dry it with heat gun until it created some bubbles due to the thick layer of paint. 

The speech bubbles are die cut from using silhouette file from the Studio Calico classes.

Love the flower embellies to bits. and also the two thickers in the kit. 


Oh... did I mention I love the woodgrain papers to bits too? It is slightly thicker than the normal white card stock and the woodgrain print on it is subtle but makes a huge difference to the texture of the layout.


I stamp the title with Stepping Stone alphas and embossed with white embossing powder. Splash some mist using my paint brush. Love how the woodgrain print showed up on the background.

The sunburst hexagon stamps is one of my new have nowadays.

Misting and cutting and stamping —> makes this layout one of my FAVE of the month!

More and more layouts plus mini albums to be shared soon! And guess what? I am meeting up with one of my scrappy girly tomorrow to learn rubber stamp carving. I am sooooo excited now! Thanks for looking =)

Thursday, August 9, 2012

It's All About Doggies

Hello there! I have been crafting a lot but I am just too lazy to post my work to the blog. This is my crafting journal to record all my crafty stuff, so I will do my best to catch up from now on. I promise =)

I created TWO more layouts using my Studio Calico June Kit after making 6 layouts + 2 minis. Must make my very very first SC kit goes extra extra miles!

1) Junior @ EastCoast Park
First time using my cameo to die cut the chevron hot air balloon and use it as a mask for misting. I have smashed the pics before but I just these pics so much and decided to make another layout for Junior's day out.

Mist with Mister Huey White mist & outline with Uniball Signo White Pen.


Love using my cameo... But not sure why the blade is blunt after cutting a few pieces of card stocks =(

2) Liposuction
Decided to create a layout with OMBRE themed after seeing it everywhere. created this layout after being inspired by Adrienne from Tablescraps.

Love the banners!

Inked the thickers with Versa color. Took a while to dry though

These are un-appealing pictures of Happy girl. The arrows pointed towards her super fat neck!

 3) Photo Inspectors

Found these funny pics of my doggies inspecting their own huge photo frames in my laptop. There isn't any reason not to scrap these cute photos right? Love the pretty colors from Crate Paper - Pretty Party collection. I scrap lifted this layout from one of the CP designer - Sophie Crespe. Check out the her awesome layout here.

A whitish / subtle title seems to work well with a colorful / busy layout. I substitute the 'O' with a pink button.


4) It's A Party 
Another cute-sie pics of my 3 dogs... Now I got you wonder how many dogs do I have right? I have a total of E-I-G-H-T dogs in Msia, 3 of them (in the pics above) are staying with my in-laws & another 5 are staying with my parents.

I heat embossed the wood veneer with Pink Zing and stamped the title. Love the way it turned out. 

I was inspired by Adrienne from TableScrap to use this pattern paper + grid stamp.

Keep layering and layering + added tonnes of embellies. 

I have more than 10 layouts and a few mini albums to show you guys! stay tuned & I promise I will update my blog periodically. TFL!